Pipelines (Grundlæggende): Opret og vis
Our pipelines are not only an easy visual tool but also a fully customizable one, suited to your firm’s needs. Once you automate them, jobs move from stage to stage, automatically creating tasks and sending emails, proposals and organizers to clients at just the right time! Read on to find out more.
Dækket her:
- Pipelines
- Using pipelines from the Marketplace
- Creating pipelines from scratch
- Viewing pipelines
- Visning af automatiseringer i pipelines
- Editing pipelines (add, move and delete stages and automations)
- Duplicating pipelines
- Deleting pipelines
- Tilføjelse af job
- Viewing accounts added to pipelines

Webinar - Workflow automatisering: Optimer dine interne processer! Tirsdag kl. 13 EST. Tilmeld dig her
Pipelines
A pipeline is an established work procedure—a sequence of steps, or stages, involved in, say, preparing a 1040 form from beginning to end.
Our pipelines are designed to look like a kanban board. Jobs, displayed on cards, move from stage to stage on the board. And once automated, pipelines do much of the work for you!
What happens inside a pipeline:
- Jobs, the individual projects a client pays you for (such as a tax return or a January payroll), are introduced to a pipeline specifically designed for it. Each job, linked to a client account, moves through the pipeline from the first to the last stage, or completion.
- Stadier er trinene i en overordnet arbejdsprocedure. Når alt det arbejde, der er involveret i en fase, er afsluttet, går et job videre til næste fase.
- Automations, the mechanisms that automate a pipeline, make things happen on their own. Once triggered, they create tasks for team members or send organizers and proposals to clients, for example.
Two pipeline examples:
Pipeline 1: 1040 return
Job 1: Selvangivelse 2015
Job 2: Selvangivelse 2016
Job 3: Selvangivelse 2017
Fase 1: Gennemgå dokumenter
Fase 2: Udarbejdelse af aftalebrev
Fase 3: Forbered afkast
Fase 4: Gennemgang
Fase 5: E-fil
Pipeline 2: Payroll
Job 1: Løn for januar 2015
Job 2: Februar-regnskab 2016
Job 3: marts-regnskab 2017
Fase 1: Gennemgå dokumenter
Fase 2: Gennemgå timesedler
Trin 3: Indled debitering
Fase 4: Send lønsedler
Using pipelines from the Marketplace
You can download ready-made email templates with the best practices. They can be edited easily.

Tip: By installing a pipeline template you’ll also get all the templates inside it, such as for tasks, chats, emails, and so on.
To add a pipeline from the Marketplace:
1. Go to Templates > Marketplace from the left sidebar and open the Pipelines tab.

2. Klik på Get free på den skabelon, du vil tilføje, eller klik på prisen, og fortsæt med betalingen, hvis det er en betalt skabelon.
3. Go to Templates > Firm templates from the left menu bar, then select the Pipelines tab and click on the name of the template to review and edit stages and automations.
Would you like to share some of your pipeline templates with other TaxDome users? If so, you can sell them on the Marketplace!
Creating pipelines from scratch
A firm owner, admin or any team member with access rights to manage pipelines can create a pipeline.
Here’s how:
From Templates > Firm templates or Workflow, go to Pipelines, then click Create Pipeline.
Se instruktionerne for hvert nummereret felt nedenfor:

1. Pipeline name: Enter a name for the pipeline; what you’ll see in the Workflow section.
2. Available to: Select the team members who need access to it. If you leave this empty, only the person creating the pipeline and the firm owner see it the Workflow section. For more, read about access to pipelines.
3. Sorter job efter: Bestem, hvordan du vil sortere jobs i stadierne. Som standard er de sorteret efter kontonavn, men du kan også sortere dem efter tid i et trin, forfaldsdato, dato for joboprettelse eller prioritet.
4. Default job template: Decide whether a template should be applied to jobs entering the pipeline and how (automatically or manually).
5. Felter til jobkort: Bestem, hvad du vil have vist på jobkort. Her er mere om tilpasning af jobkort.
6. Recurrence: Schedule jobs that repeat to be automatically created inside the pipeline. Here's more about setting up a schedule for recurring jobs.
7. Navn på etape: Indtast navnet på den første etape.
8. Tilføj etape: Tilføj så mange etaper som nødvendigt, og link automatiseringer til dem.
9. Tilføj automatiseringer: Link så mange automatiseringer til faser som nødvendigt. Når et job flyttes til et nyt stadie, der indeholder automatiseringer, udløses disse handlinger automatisk en efter en i en bestemt rækkefølge. For eksempel oprettes en opgave, der genereres en organisator, og der sendes en e-mail. Her er mere om, hvordan automatiseringer fungerer.
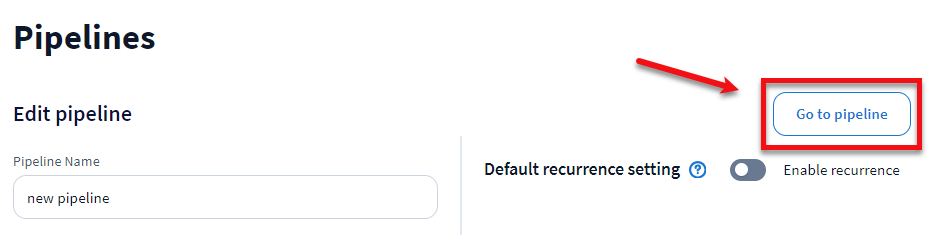
10. Save: Save the pipeline. Once you've done it, you can click on the Go to pipeline button and start adding jobs to it for your client accounts.
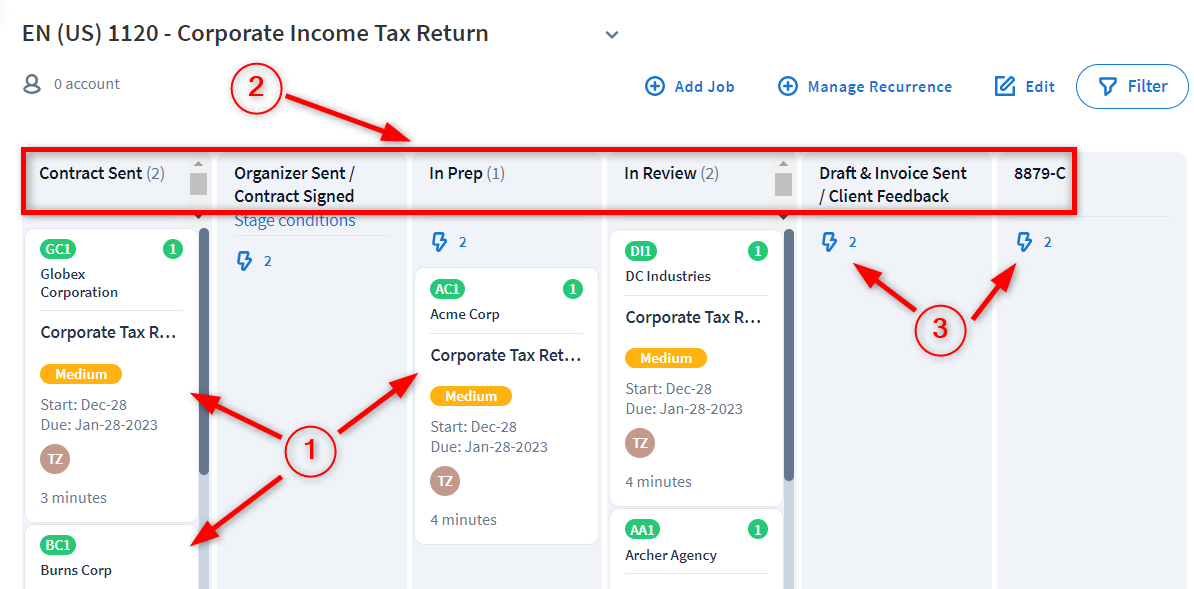
Viewing pipelines
View pipelines either for a single client account, for all accounts or those with recurrences:
- For one client account: Go to Clients > Accounts from the left menu bar, click on the account name, then select the Workflow tab. You’ll see all the pipelines with jobs for that client account and the progress made. Once a job has been completed and archived or deleted, it’s no longer visible. However, if the pipeline has no active jobs but the recurrence is set for that account, the pipeline will still be displayed on this page.

- For all client accounts: Go to Workflow > Pipelines from the left sidebar, then select the pipeline. To go to another pipeline, use the drop-down menu.

- With job recurrences: Navigate to Workflow > Job recurrences from the left menu bar to view and access pipelines for which recurrences are set.

Editing pipelines (add, move and delete stages and automations)
A firm owner, admin or team member with access rights to manage pipelines can edit a pipeline.
Here’s how:
- From the pipeline, click Edit on the top right of the page or click the automation icon below a stage name, then click the Add automation link.

- From the pipeline templates list, go to Templates > Firm templates from the left menu bar, select the Pipelines tab, then click on the name of the pipeline.
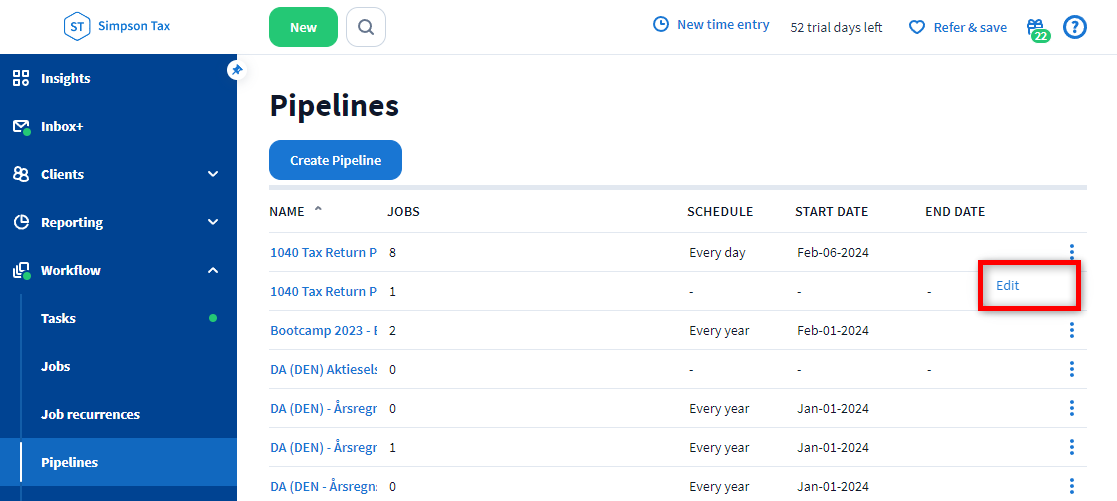
- From the pipeline list, go to Workflow > Pipelines from the left menu bar, click three dots to the far right of the name of the pipeline, then select Edit.
Once you are in the edit window, you can change the pipeline settings (see above for details) and make changes to the stages:
- For at tilføje en scene skal du klikke på Tilføjscene eller +-knappen og derefterindtaste navnet på scenen.
- For at flytte en scene skal du pege på flytteikonet til venstre for scenens navn og derefter trække og slippe den.
- For at slette en scene, klik på skraldespandsikonet til højre for scenens navn.
- For at tilføje automatisering til en scene skal du vælge scenen og derefter klikke på knappen Tilføj automatiser inger eller på en automatisering, hvis der allerede er en.
-
Hvis du vil have ekstra e-mails sendt til kunder, når de ikke svarer inden for en bestemt tidsramme, skal du finde Påmindelser under automatiseringsskabelonen og derefter vælge Aktivér i rullemenuen. Her er mere om påmindelser.

Attention! When you delete a stage in a pipeline, all jobs at this stage will be deleted. Make sure that all the necessary information is saved to prevent data loss.
When you're done, click SAVE. After that, you can click on the Go to pipeline button to see your changes.
Duplicating pipelines
To create new pipelines based on existing ones, go to Templates > Firm templates from the left menu bar, select the Pipelines tab, click three dots to the far right of the name of the pipeline, then click Duplicate. A copy of the pipeline is saved with a suffix (e.g., 1040 Return (2)). Stages, automations and other template settings are copied as well. However, you’ll need to manually add jobs to a newly duplicated pipeline.

Deleting pipelines
To delete a pipeline, go to Templates > Firm templates from the left menu bar, select the Pipelines tab, click three dots to the far right of the pipeline and select Delete.

Note: This deletes all jobs linked to the pipeline.

Viewing accounts added to pipelines
To find out which accounts have been added to a specific pipeline or to a stage in a pipeline:
- Go to the Clients > Accounts or Workflow > Jobs from the left menu bar, then click on the FILTER button.
- Select a pipeline name in the Active jobs filter and select the stage. You can select several pipelines and stages if needed.
You’ll then see a list of all client accounts that were added to the selected pipeline and/or stage.
